
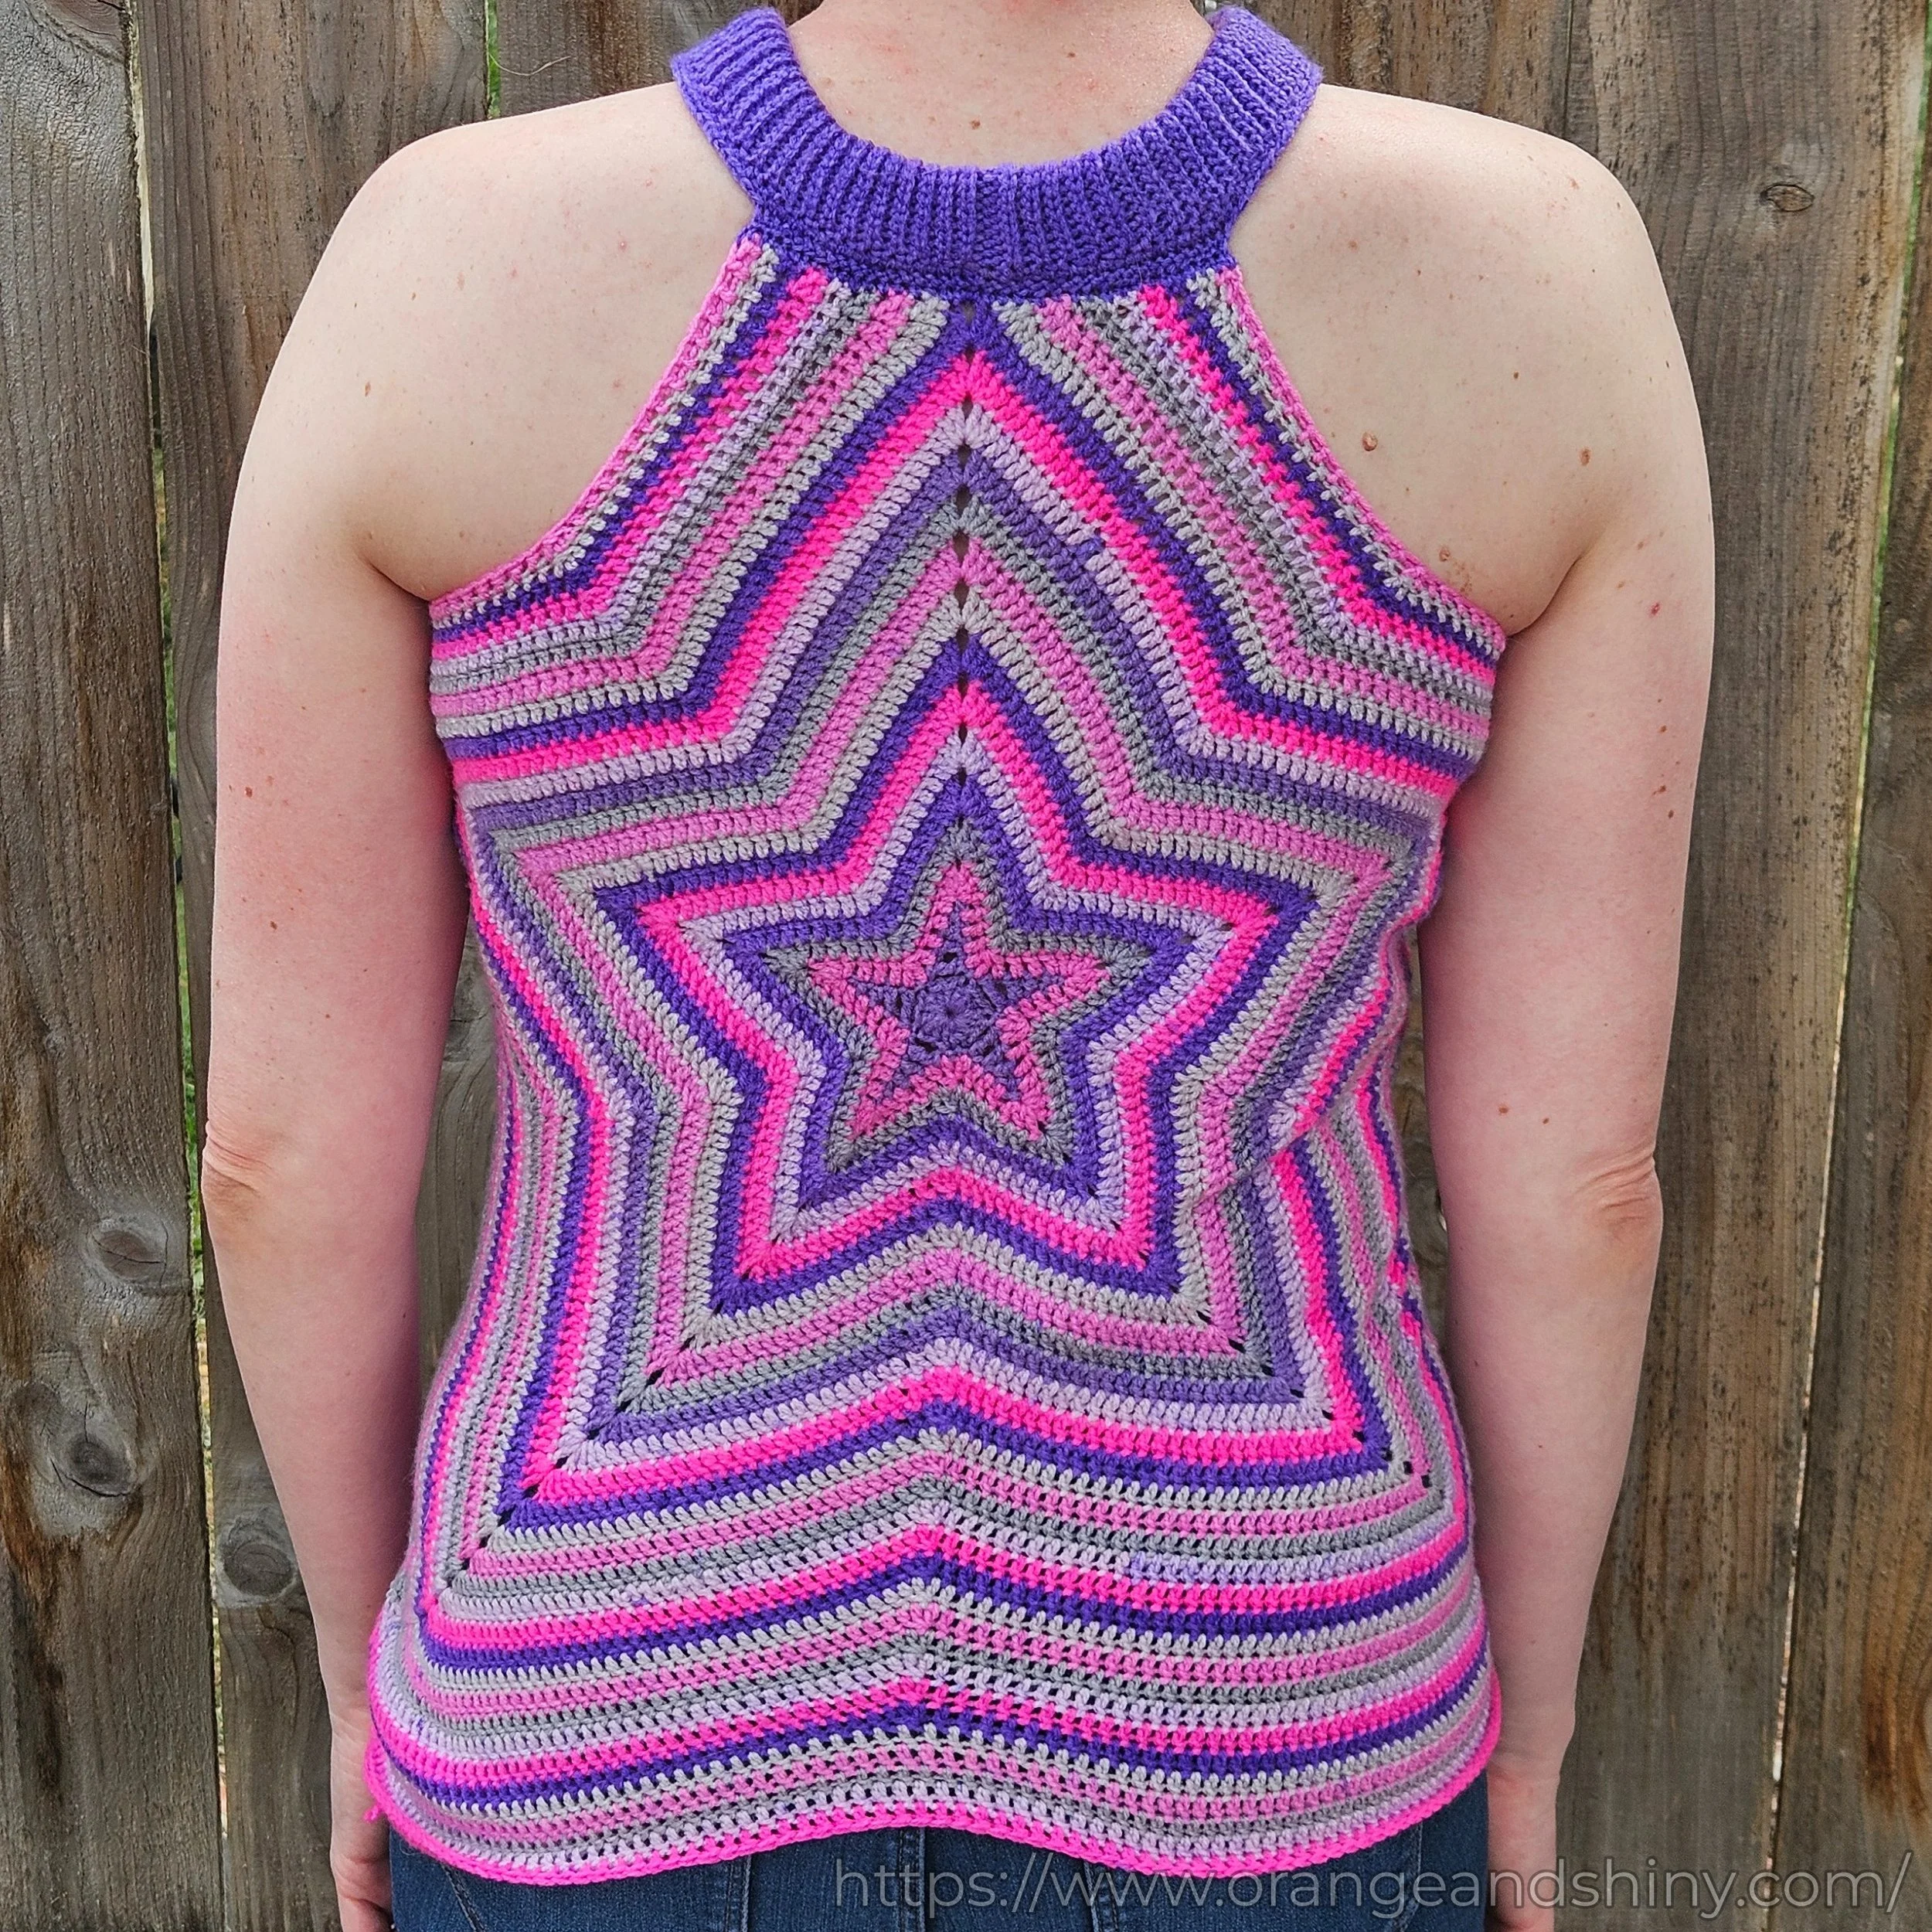
Star NOT A Halter Crop Top
In my continued quest to use up the mandala yarn that I acquired so much of in 2020 and 2021, I came across this Crochet Star Halter Crop Top Tutorial from Mrs Moon & Heaven on YouTube and thought it was super cute. The problem was that I wouldn’t be comfortable in a halter top that tied like this - I wanted more coverage. So what did I do? I decided to figure out how to smoosh two of these star panels into some kind of tank top that I would actually wear. It took me a few weeks, but I did it!
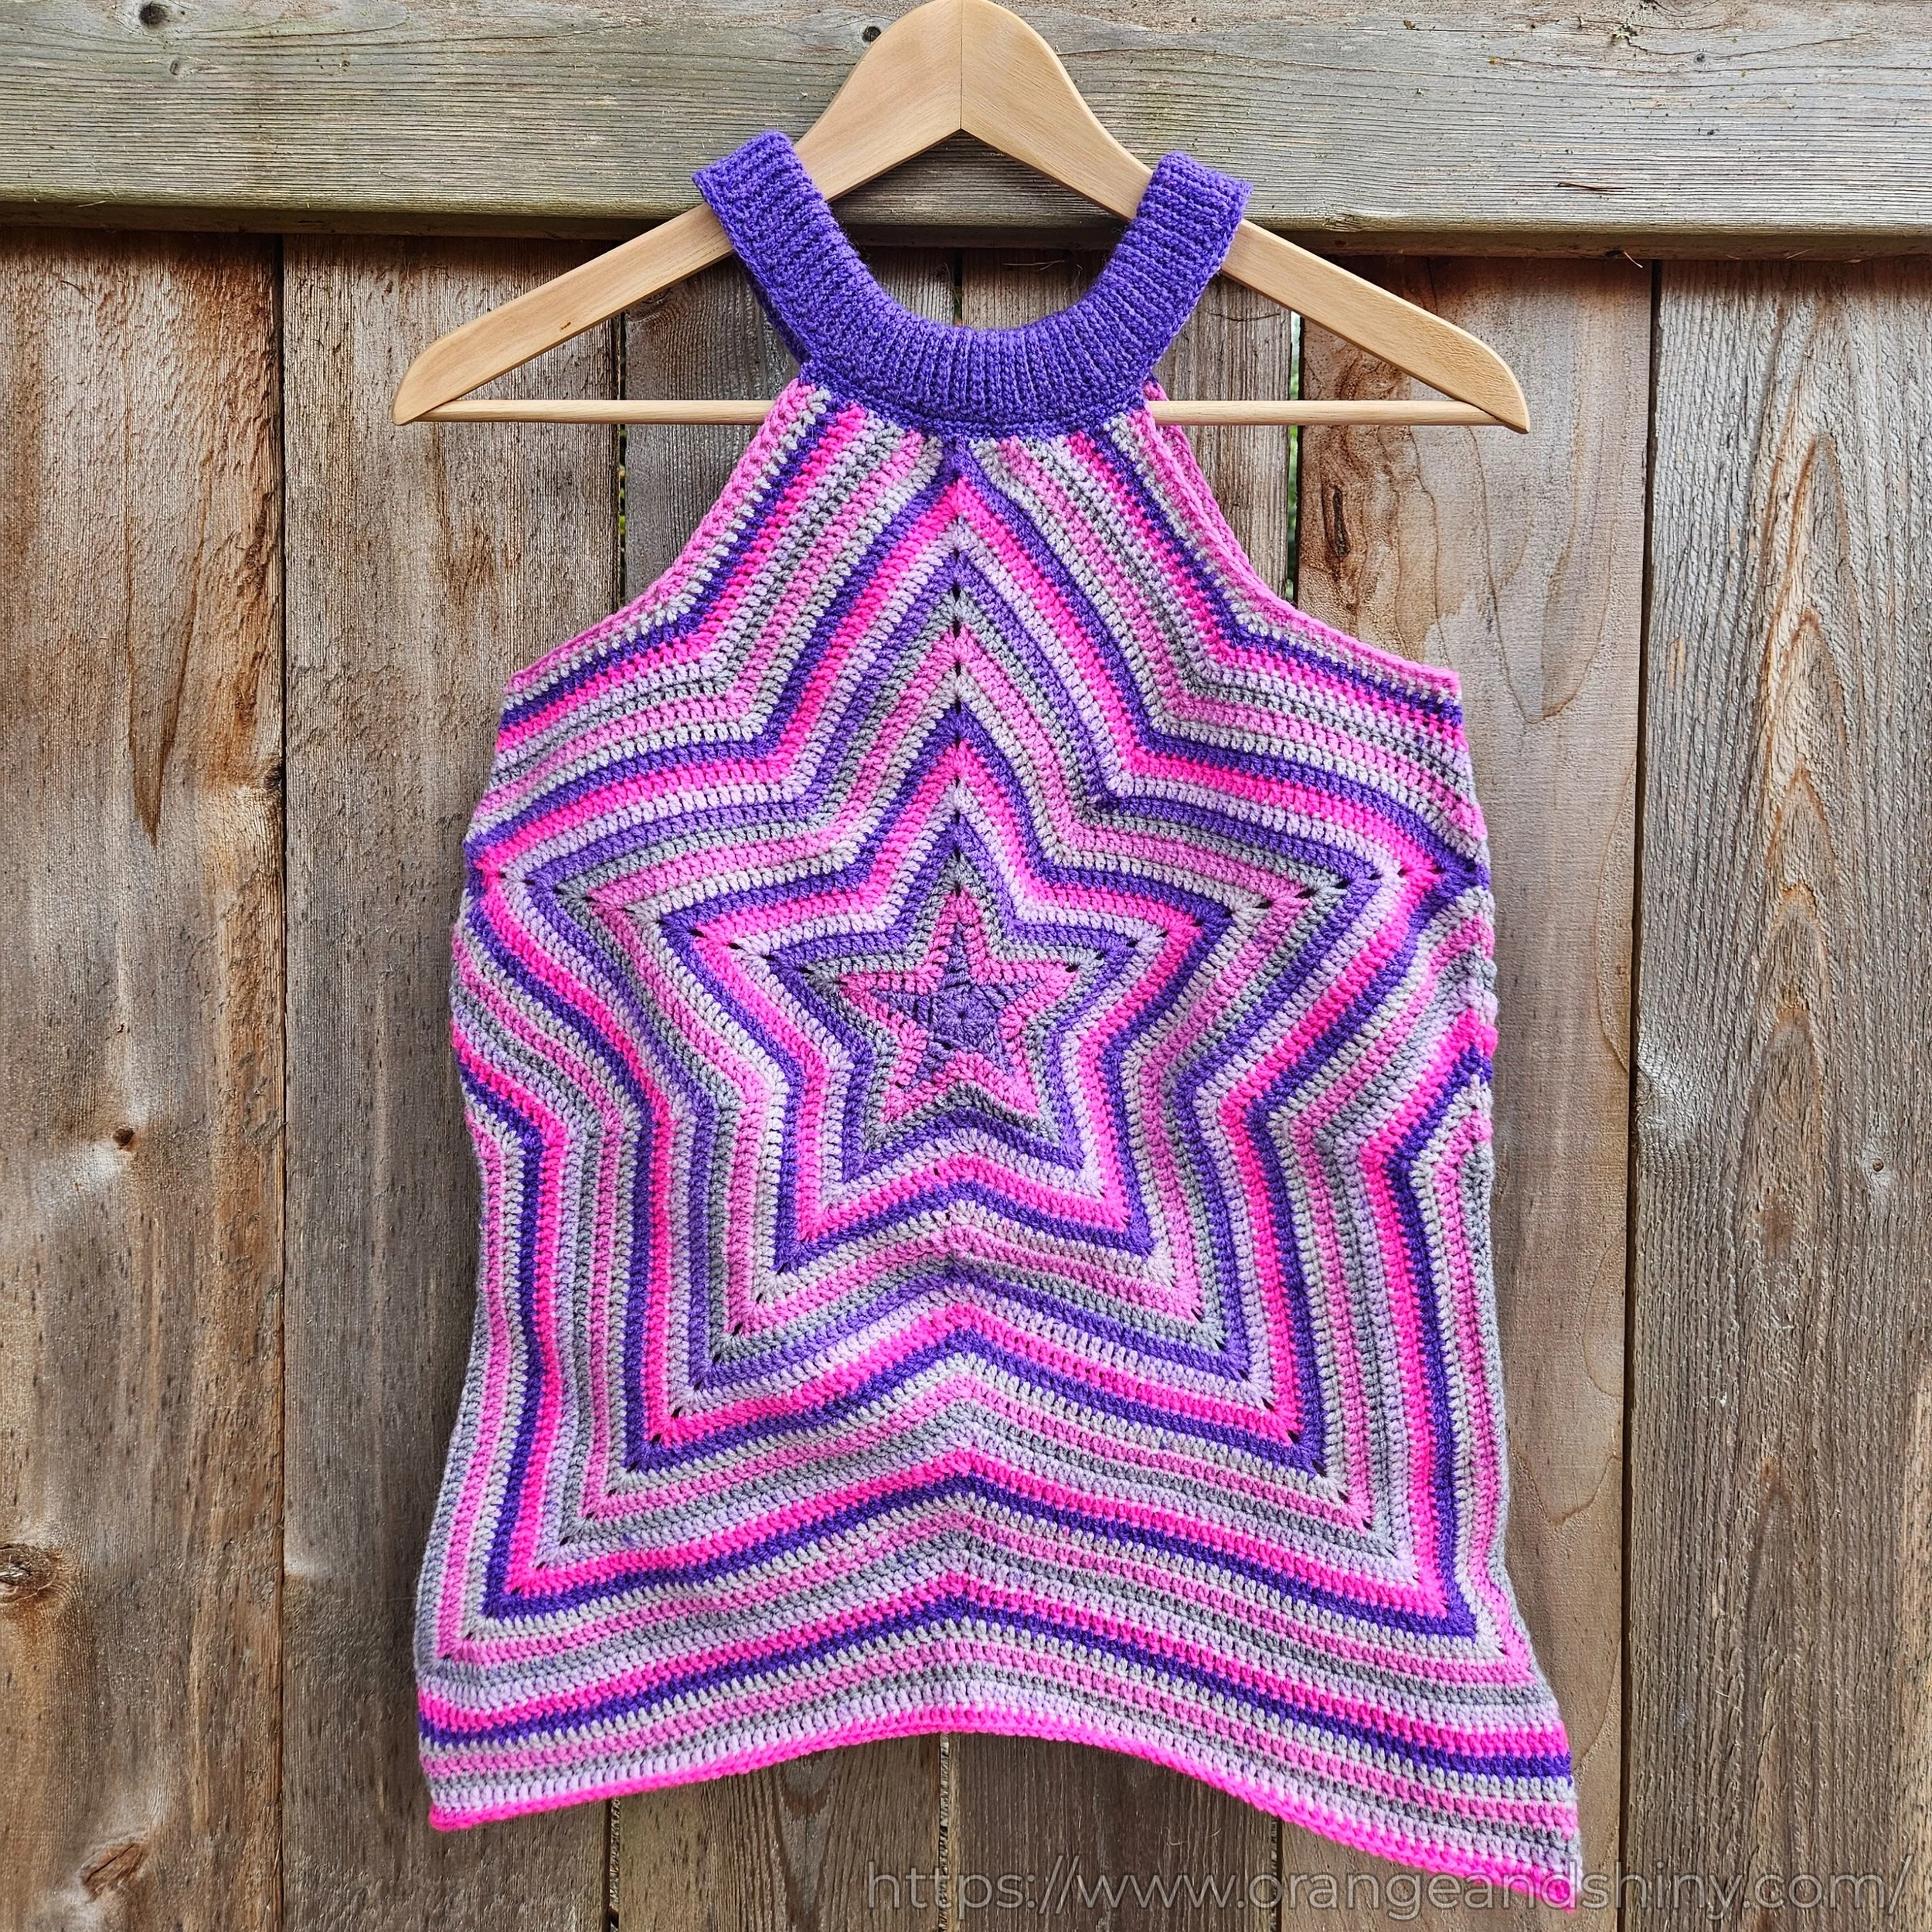
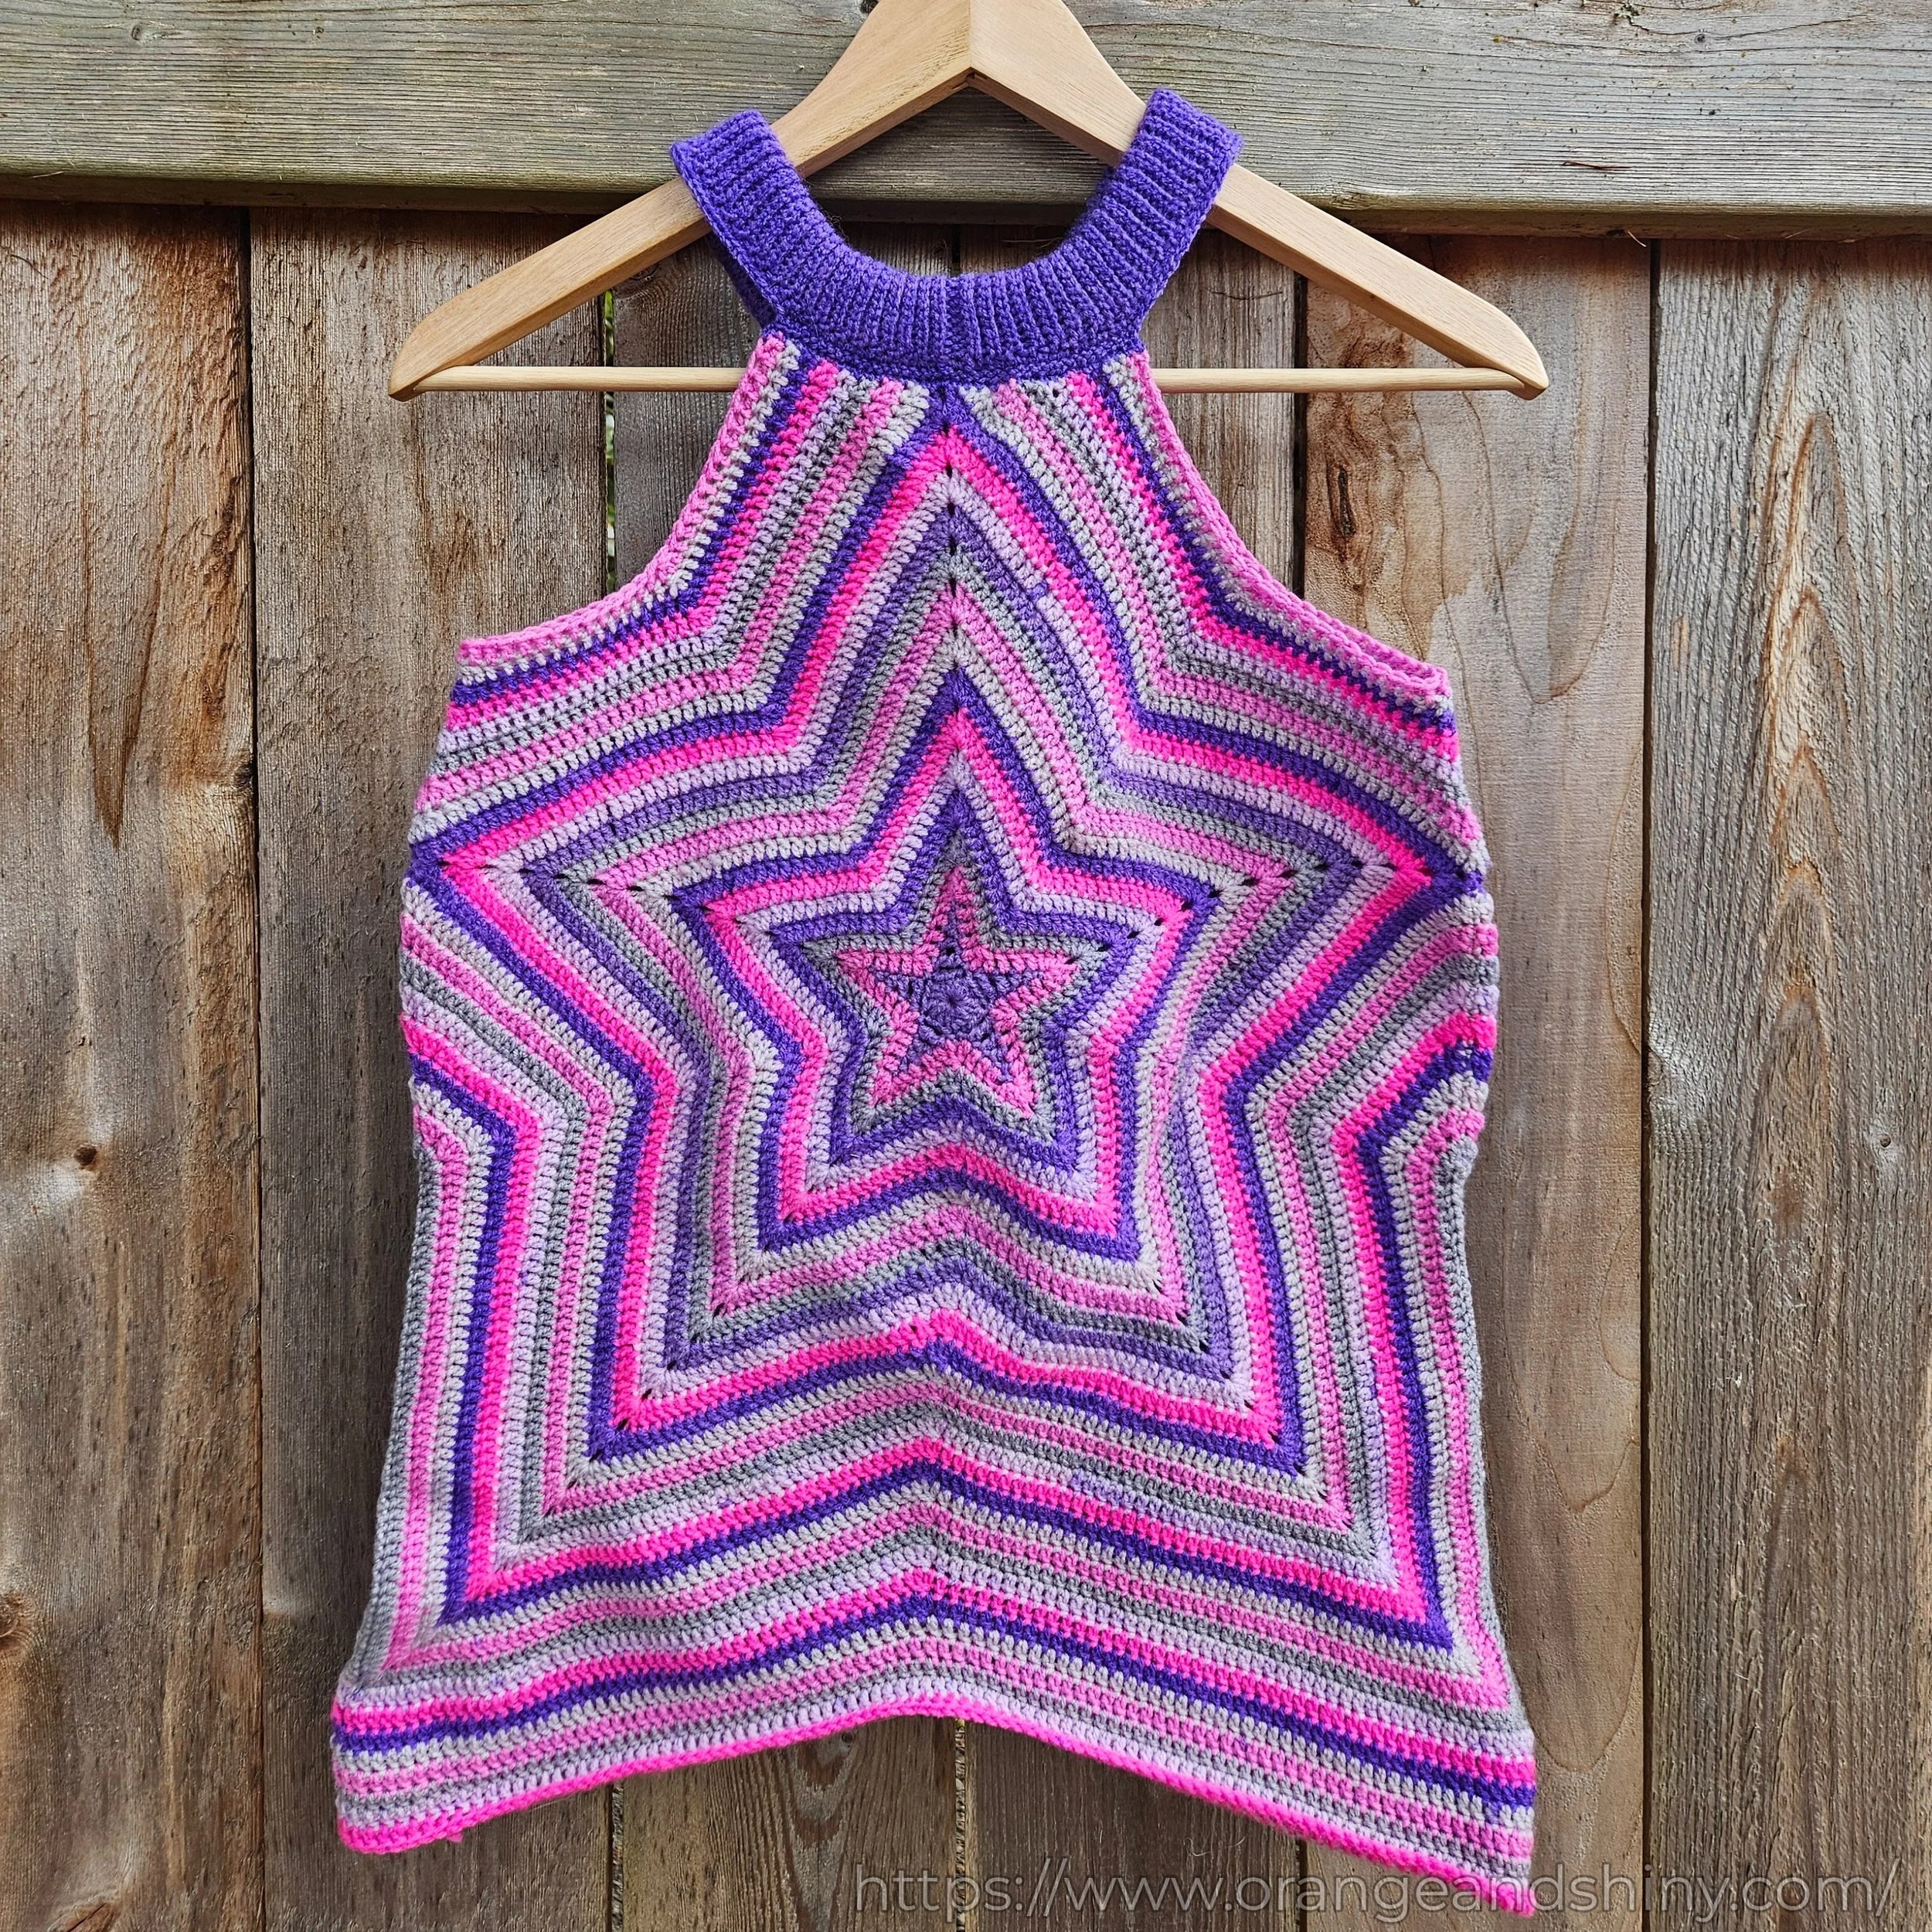
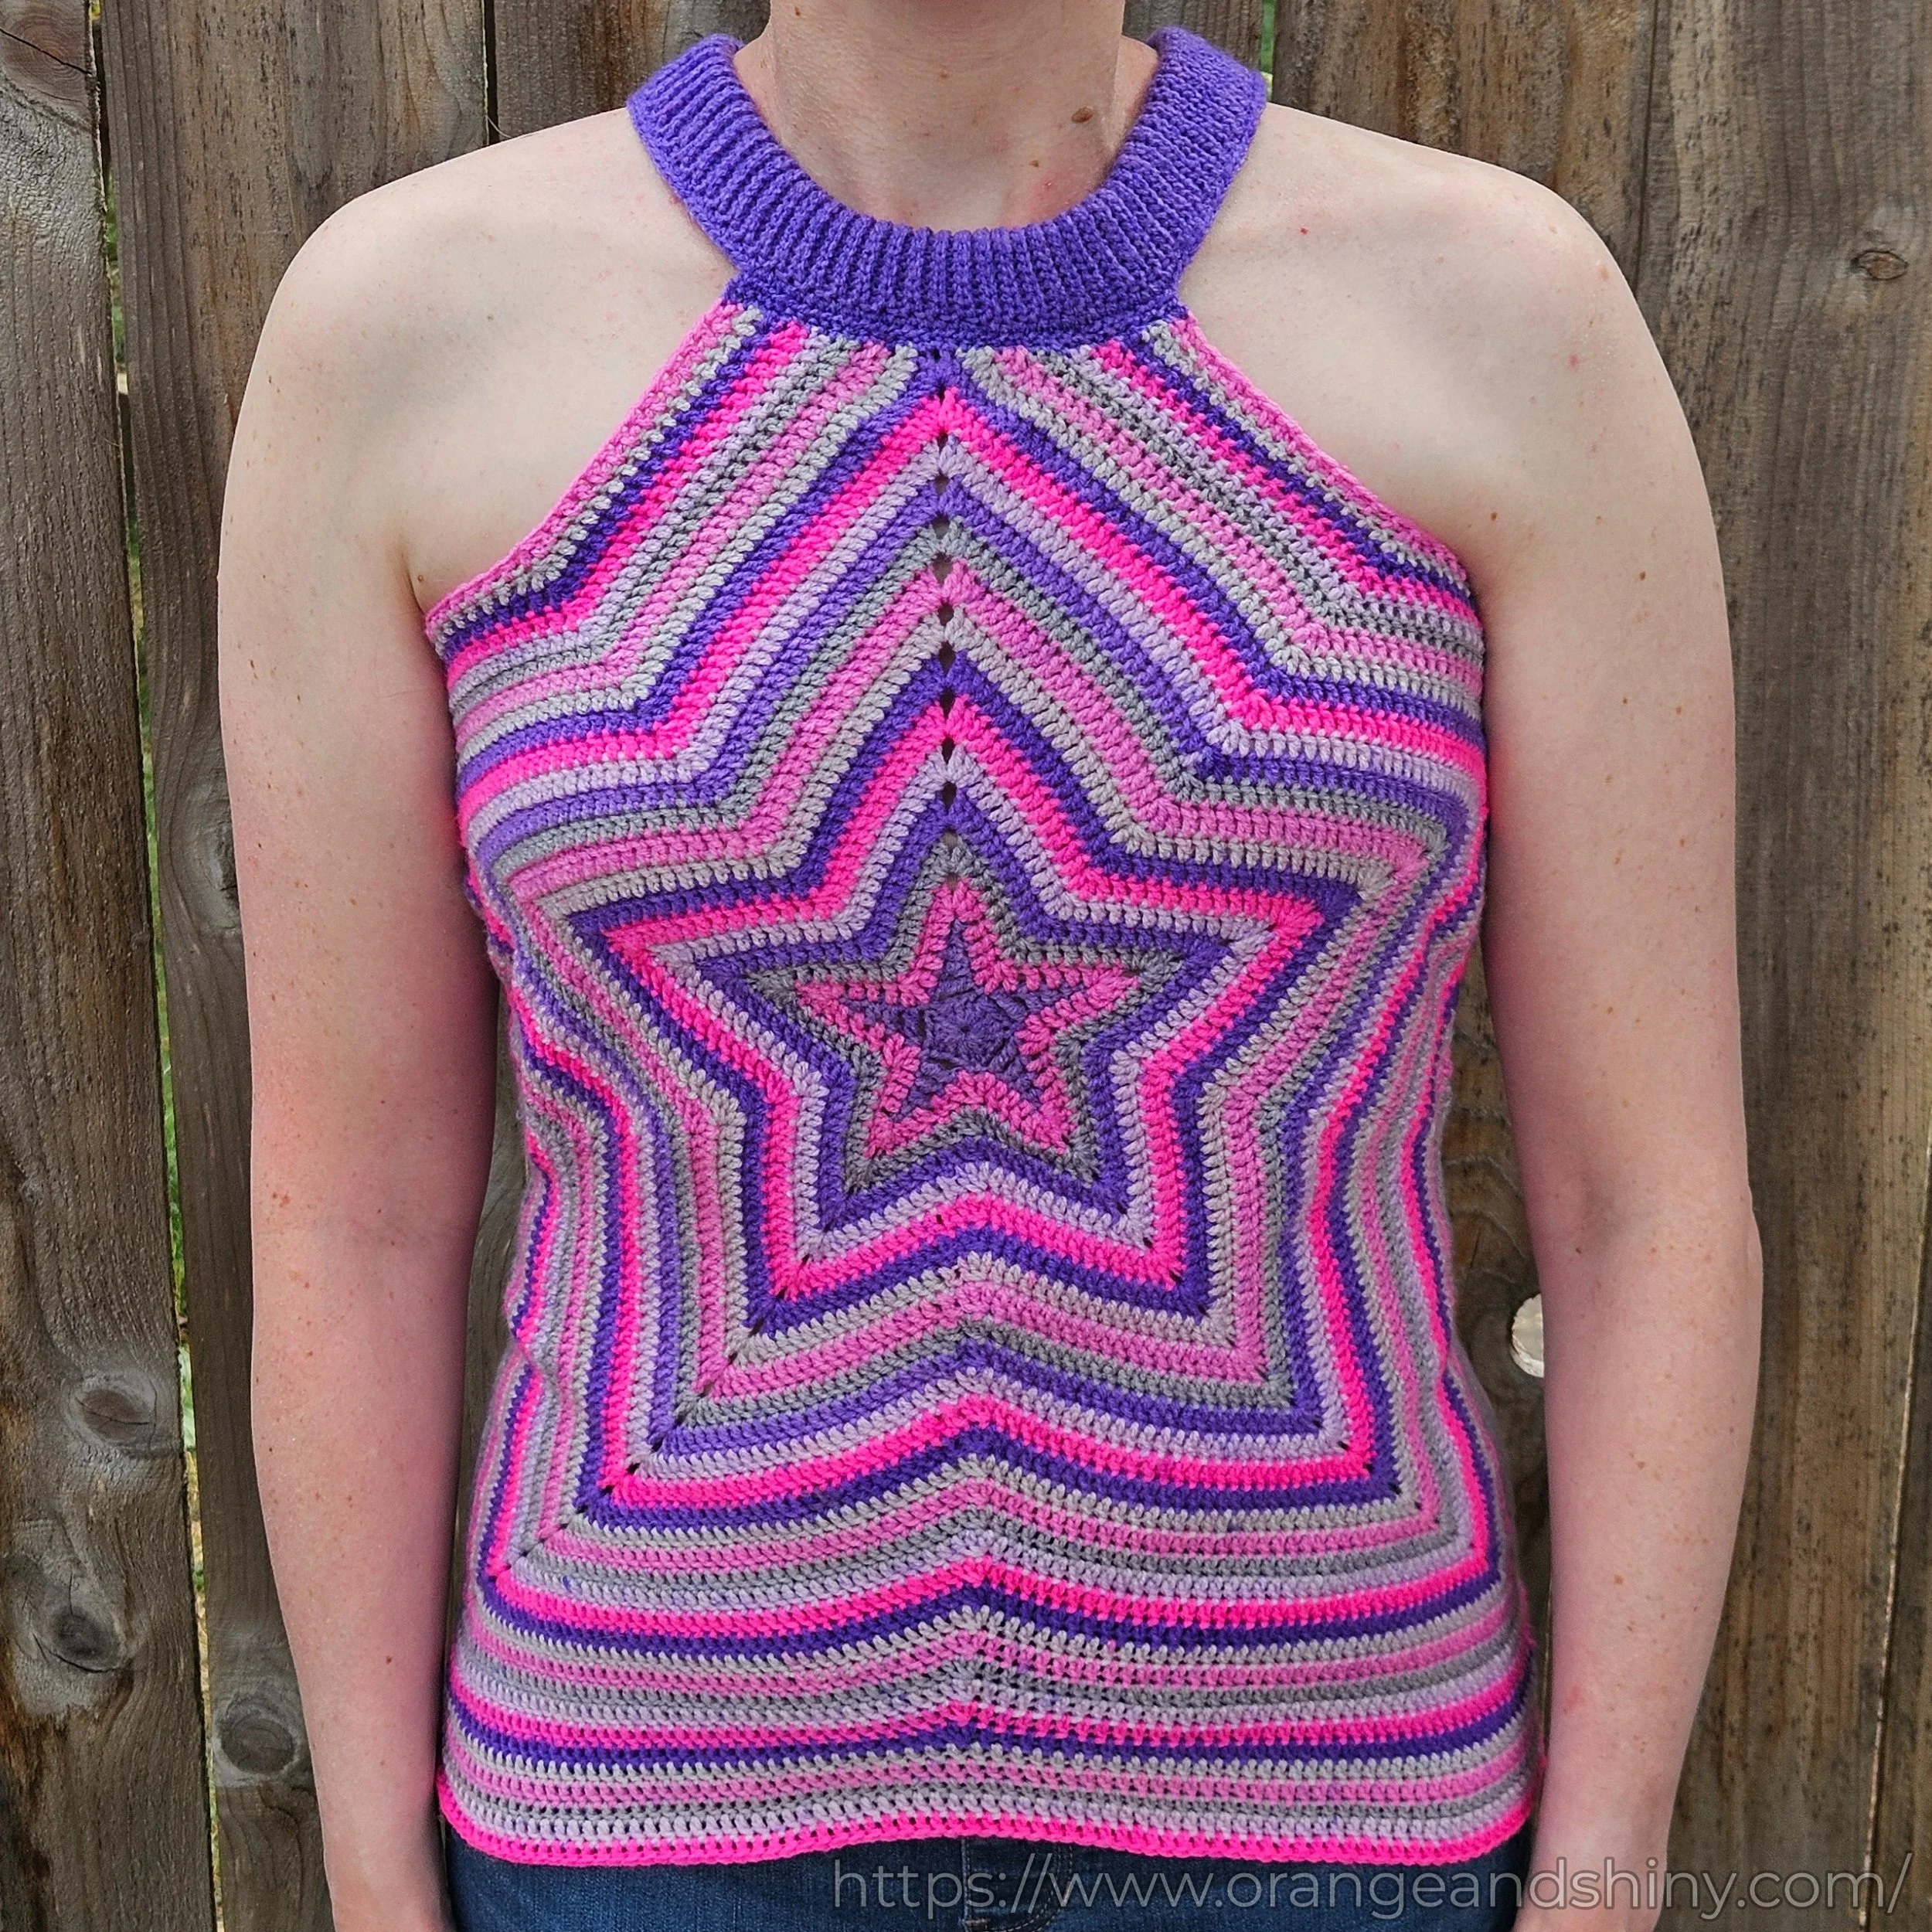
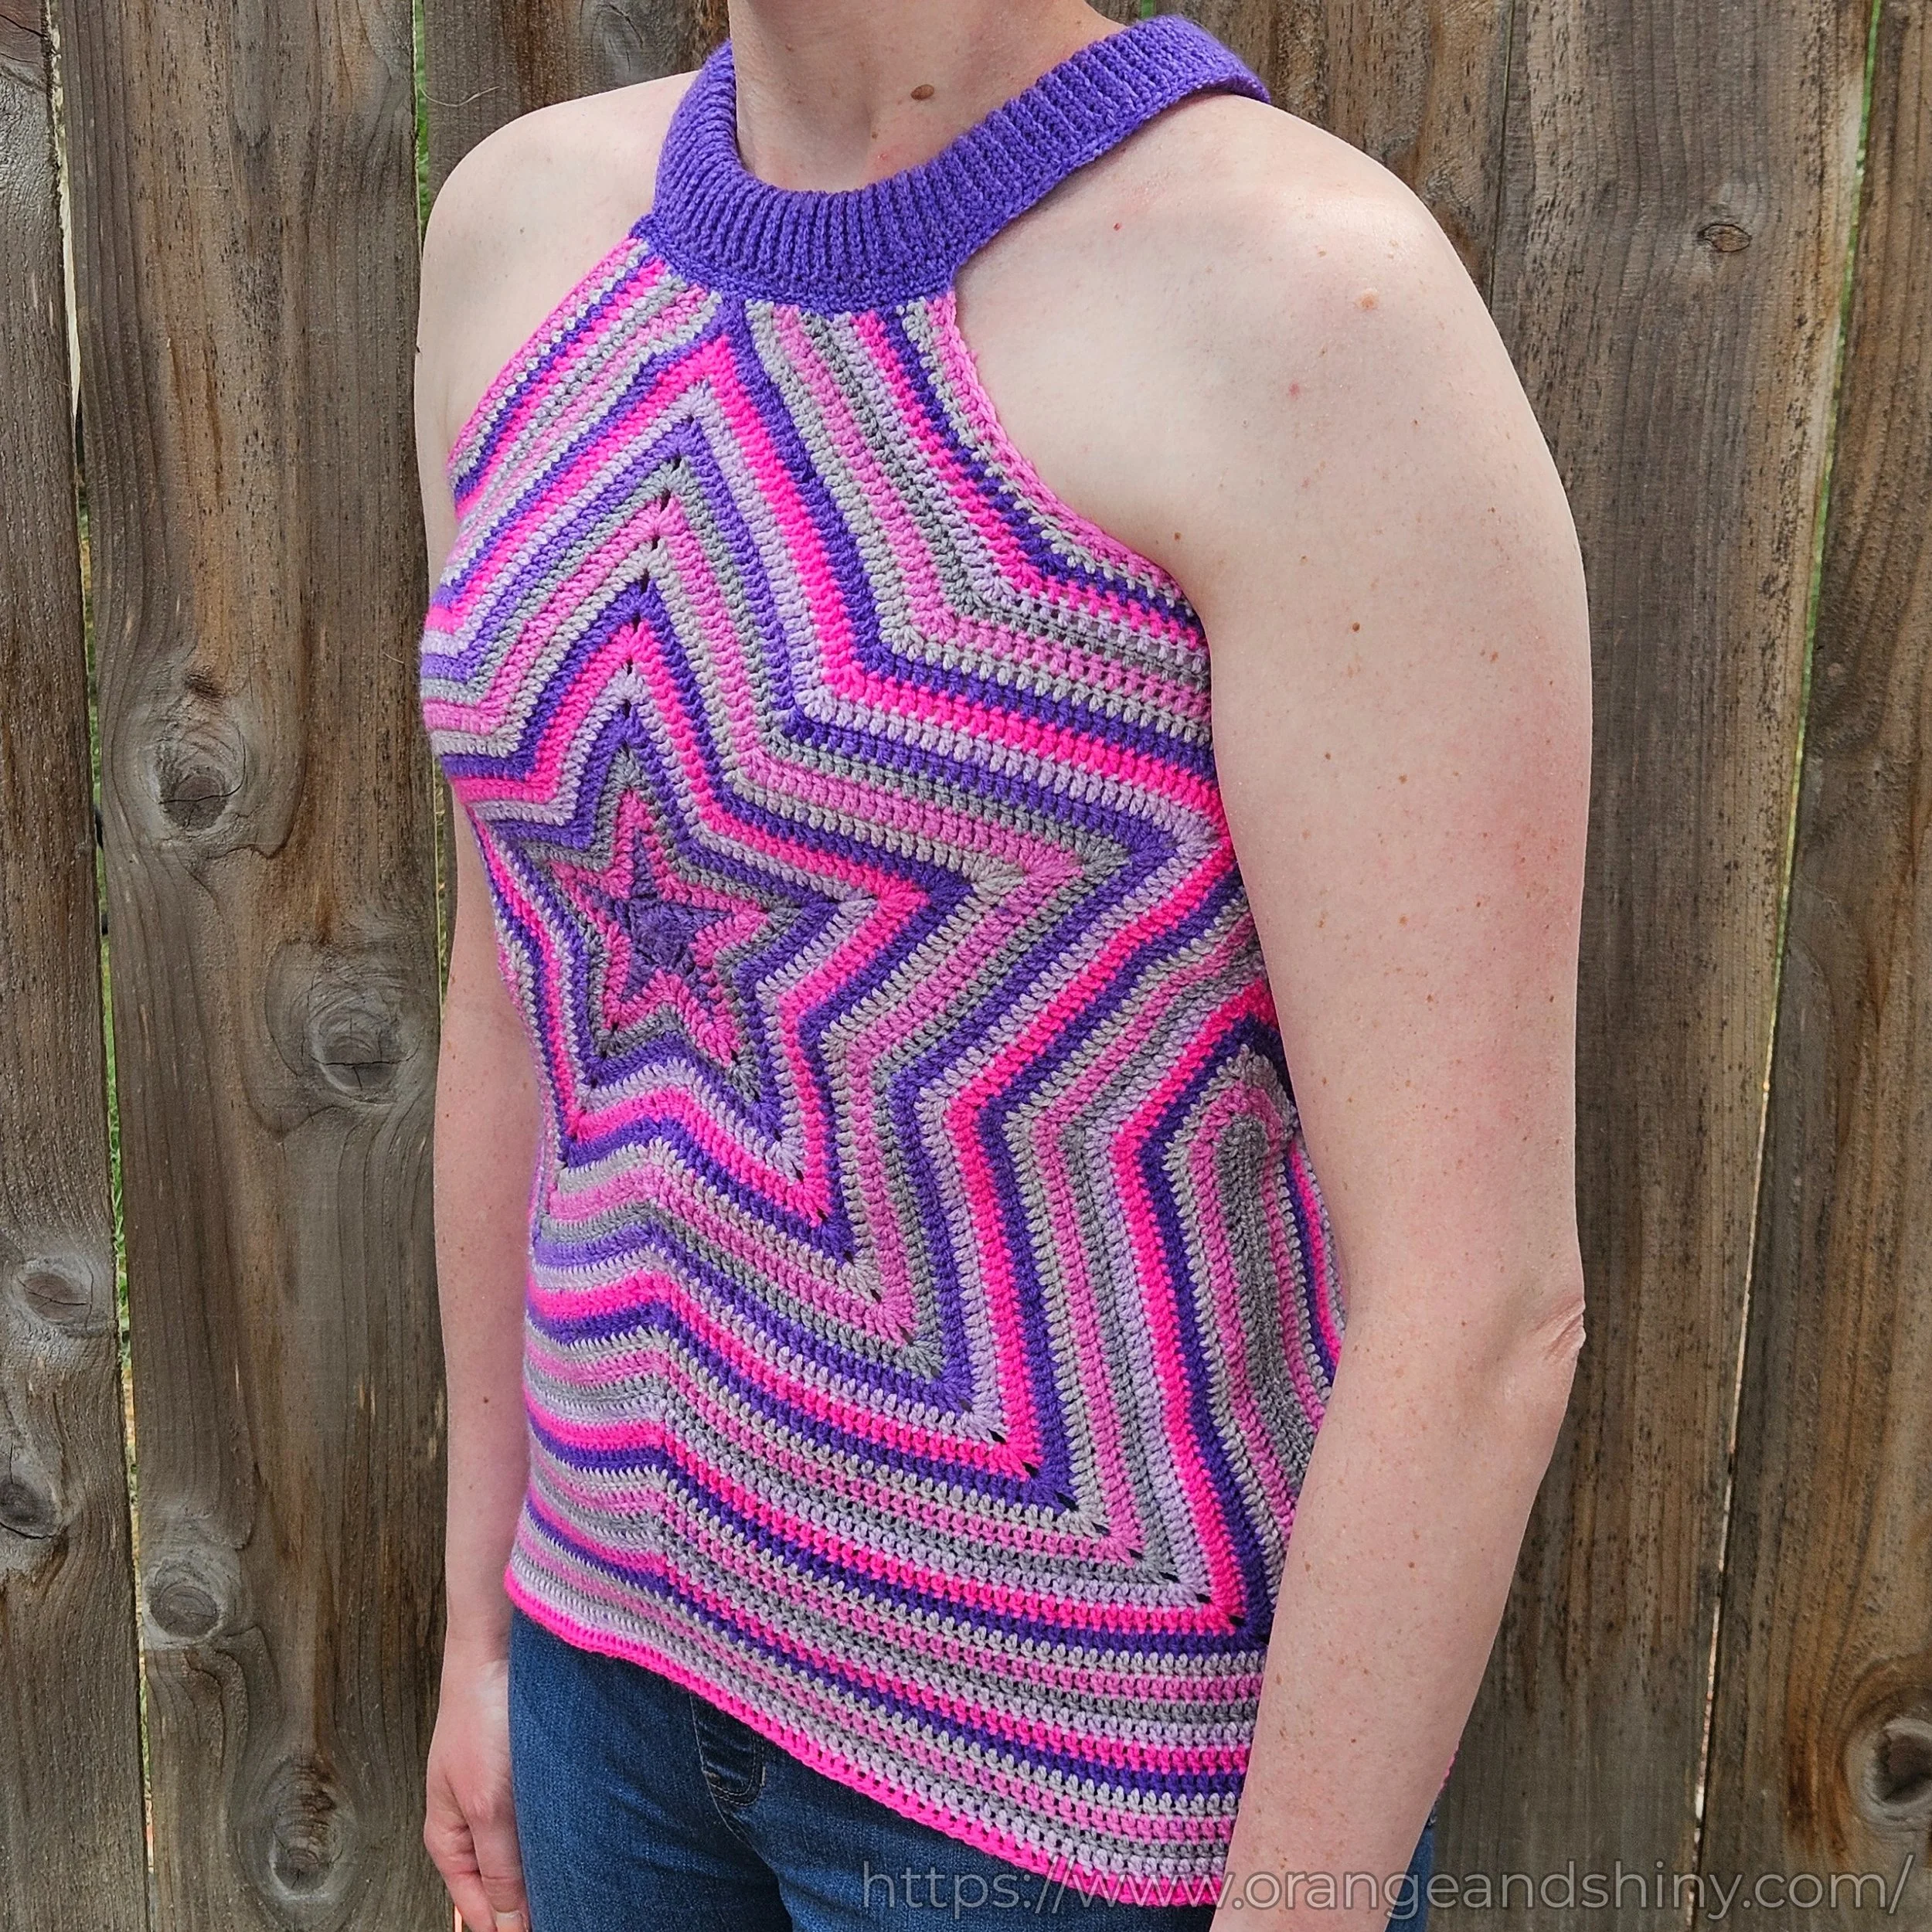
This top felt like a great match to use up the remains of my Tutu Much Lion Brand Cupcake yarn (I’m definitely not laughing at the unintentional pun) that I previously used in my Neat Ripple blanket. The basic idea behind how I crocheted and constructed my top was:
I crocheted two star panels according to the YouTube tutorial until the width of the panels at the upper left and upper right points could meet under my arms/around my bust
I flattened the left and right sides (while also adding length) by adding rows below the upper left and upper right points on each panel
I attached/seamed the two panels together from the upper point to the lower point on the left and right sides
I created a wide flat neckline and added coverage by adding rows from top point, through the armpit, and back up to the top point of the other panel on both sides
I crocheted a slip stitch ribbing collar and attached it to the wide flat neckline at the top of each panel
I added rounds to the bottom for additional length
This took me a lot of trial and error to figure out, but I love the end result. I honestly didn’t think I could cobble my way to something so neat. I’m leaving my design notes below - hopefully they can guide you through your own trial and error to make your own version!
Materials
3.5mm crochet hook
Light weight yarns in multiple colors
I used Lion Brand Cupcake in the Tutu Much colorway where all colors had been cut and wound individually
Yarn Needle
Terminology
Ch - chain
Sl st - slip stitch
Sc - single crochet
Dc - double crochet
Increase - 2 single/half/double crochet in the next stitch
Decrease - invisible decrease
BLO - back loops only
Star Panels
Follow Mrs Moon & Heaven’s YouTube tutorial to create 2 star panels that can meet at the upper left and upper right corners around your bust. I crocheted my panels at the same time to make checking the fit easier and went with 14 rounds each (ending on a purple round as you’ll see in the picture in the next section).
Flatten Lower Sides of Star Panels
I added the following 9 rows onto each panel basically continuing to follow the pattern from the tutorial video, but moving from the upper left point, down around the bottom two points, and finishing at the upper right point. This creates flat sides for seaming while also adding width and length. Here’s a picture of one of my panels after finishing this step for reference - the rows added in this step are indicated by the curly brackets. I’ve also indicated the color I was using on each row here in case it’s helpful to follow along. You may need more or less rows based on how you want your top to fit, etc.
Row 1: (Light Purply Gray) - Dc decrease x 3 at beginning and end of row
Row 2: (Medium Pink) - Dc decrease x 2 at beginning and end of row
Row 3: (Gray) - Dc decrease x 3 at beginning and end of row
Row 4: (Lavender) - Dc decrease x 2 at beginning and end of row
Row 5: (Hot Pink) - Dc decrease x 3 at beginning and end of row
Row 6: (Purple) - Dc decrease x 2 at beginning and end of row
Row 7: (Light Purply Gray) - Dc decrease x 2 at beginning and end of row
Row 8: (Medium Pink) - Dc decrease x 2 at beginning and end of row
Row 9: (Gray) - Dc decrease x 2 at beginning and end of row and DO NOT do the normal Dc 3 together on the left and right sides
Attach Star Panels
Now seam the two panels together from the upper point to the lower point on each side. I didn’t take a picture at this step in the process, so I included one from later in the process and marked where you’ll need to sew between the arrows. I used a mattress stitch and one of the lighter colors of yarn and was pleased with the result.
Once this step is complete, you should basically have a 2 star tube that should fit from your bust down. If it does not, you will need to rip back and adjust as needed.
Create a Wide Flat Neckline
Creating a wide flat neckline at the top point on each panel (while also adding coverage) is the next part you’ll need to tackle. I crocheted the following 8 rows essentially continuing to follow the pattern on each side of my tube moving from the right panel top point, through the armpit where the upper points meet, and back up to the left panel top point (and then repeating the same thing through the other side’s armpit so everything is even). Here’s a labeled picture to give a better idea of what I mean (I added more rows after this picture was taken).
Row 1: (Light Purply Gray) - Dc decrease x 3 at beginning and end of each row (at the top points) and decrease between the ch spaces where the stars join (from the upper left and right points of your panels)
Row 2: (Medium Pink) - Dc decrease x 2 at beginning, [decrease, decrease 3 above the star connection ch space decrease, decrease], Dc decrease x 2 at end
Row 3: (Gray) - Dc decrease at beginning and end of row (with a decrease 3 above the previous decrease 3)
Row 4: (Lavender) - Dc along just doing a decrease 3 above the previous decrease 3
Row 5: (Hot Pink) - Dc decrease at beginning and end of row with a decrease 3 above the previous decrease 3
Row 6: (Purple) - Dc along just doing a decrease 3 above the previous decrease 3
Row 7: (Light Purply Gray) - Dc decrease at beginning and end of row (with a decrease 3 above the previous decrease 3)
Row 8: (Medium Pink) - Dc decrease at beginning and end of row with a decrease 3 above the previous decrease 3
Create A Ribbed Collar
Now you’ll crochet a ribbed collar to attach to the wide flat neckline you just created. I used a strip of slip stitch ribbing that was 17 inches in unstretched length (since I have a huge head it had to fit around). You’ll want to make your strip big enough to fit around your head (when stretched) and can make it thinner or thicker by adjusting the number of stitches in each row.
Ch 21
Row 1: sl st across (20)
Row 2: ch1, turn, sl st in both loops, sl st across in BLO, sl st in both loops in final stitch (20)
Repeat row 2 until your desired length
Once you’ve reached your desired length, sl st the right and left short edges of your strip together to form a circle. Now fold your strip in half so the top and bottom long edges meet. Seam along these edges using sc.
To prep for attaching the ribbed collar, I did a row of single crochet across the top of the wide flat neckline in the same color as my collar on both the front panel and the back panel. I then used a mattress stitch to attach these rows of single crochet to the single crochet on the edge of the collar making sure to place the collar’s short edge seam in the middle of the back panel.
Add Bottom Rounds For Length
I wanted to add a little more length and even out the bottom edge, so I added the following 8 rounds (denoted in the picture below by the curly brackets - also, I totally went out of order when I made this… you caught me). Again, you may need more or less rounds based on how you’d like your top to fit.
Round 1: (Lavender) - attach just beside one side seam. Continue to dc as normal (aka following the pattern) to the other side and place a decrease in the ch spaces where the two stars meet at the lower points. Continue down the other side and place another decrease in the ch spaces where the stars meet. Sl st to the 1st dc
Round 2: (Hot Pink) - attach to the right of the last decrease. Dc around as normal
Round 3: (Purple) - attach to the right of the last decrease. Dc around as normal
Round 4: (Light Purply Gray) - Dc around (no decreases anywhere)
Round 5: (Medium Pink) - Dc around (no decreases anywhere)
Round 6: (Gray) - Dc around (no decreases anywhere)
Round 7: (Lavender) - Dc around (no decreases anywhere)
Round 8: (Hot Pink) - dc around (no decreases anywhere)
Once you’ve hit the length you want, weave in all those ends and you’re done! Please let me know if you make this star NOT a halter crop top - I’d love to see what others come up with!